.

Monday, April 4

Cabinet Makeover: from Folk Country to French Country
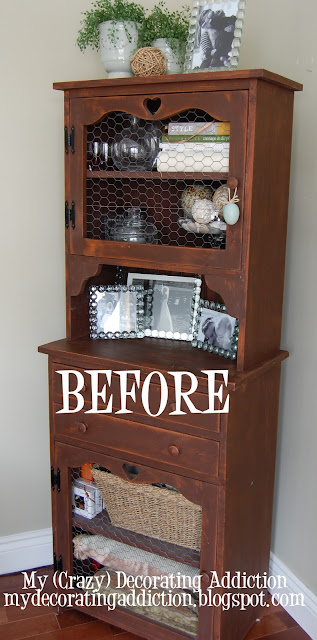


I've been wanting to makeover this little cabinet for awhile now.

The only thing that held me back was that it was a custom made piece by one of my favorite local word-working shops, The Barn Loft. Call me craftsman-loyal, I hated to 'mess' with something that was handcrafted with such care.

That folksy-country look was really 'in' at the time  - about 10 years ago. But those carved hearts now felt dated,  and the brown stain no longer matched with my lighter, more airy decor.

But I felt it was worth salvaging, since there was lots I still loved about it, like the exposed hinges, and the chicken wire; not to mention the extra storage.

To stay around, there was a list of things that HAD to go, starting with the paint colour. I purchased Behr's Premium Plus Ultra (with the primer built in) in Coastal Beige. This is an awesome creamy white colour.  I just love painting furniture with Behr paints.  For me, there is no comparison.


Next to go - the pine, painted knobs.  Since I was going for more of a french country look, I decided to swap them out for pretty glass knobs.


And, finally, those kitchy country hearts would have to be concealed somehow.  I was stumped for awhile, until I found these sweet little accents at Home Depot, and thought they were the perfect size and style to hide the heart-shaped holes.

All in all, I spent about $50 on supplies - $20 on paint, $20 on knobs, and $10 on the accents.

Here's some shots of the my work-in-progress.


So long little country hearts!

And, here's the finished product!

With a little paint, these accents worked out so well!


A little distressing to keep the look aged and chippy.


Isn't it funny how some silly hang ups hold us back from making lovely changes in out homes?   I wish I had painted this sooner!  It really lightens up my living room.

Until next time, happy decorating.


This tutorial was featured at:


I also shared this project at...

Furniture Feature Fridays


Making

Labels: , ,

Wednesday, February 23

Refinished Morris Chair: Reveal!

In my last post, I talked about the chair I was refinishing.

Well, here it is...


To get this distressed look, I first painted the chair in a fresh blue paint (the colour was Pure Water by SICO), and then I rolled on one very light coat of antique white.

Next I sanded it down until the blue began to peek through.  I sanded the edges more heavily in places where it would naturally wear on its own over time, until the original wood began to show.

Finally, I dabbed a sponge brush in some of Folk Art's Sky Blue craft paint and dry sponged it on very lightly in the areas that were most heavily distressed.


As this chair was originally in my maternal Grandmother's home (and was built by my great-Grandfather almost 65 years ago), I really wanted to have a special touch that reminded me where it came from. The "B" monogram is an ode to my mom's family name.


I used a stencil and some Sky Blue paint for the monogram, and the flourishes were created with a few of my stamps and an "Old Olive" Craft stamp pad from Stampin' Up.  I used a sanding block to sand it down a bit so it looks more authentically aged. I like the way it turned out.


I know my limitations, so I bought the cream cushions rather than making them myself.  I found them at Pier One. But I did make the little skirt myself.

The awesome down-filled bird pillow was a fab find at Homesense.  In keeping with the bird theme, I originally thought about painting the word "Perch" on the chair instead of the monogram.  This chair was always a favorite 'perch' in my Grandmother's kitchen.  But there wasn't much room on the chair frame for words, so I kept it simple.

The chair fits great in this little corner of the kitchen, overlooking the backyard.  It's actually a REALLY comfy chair. It'll be a sweet spot to sit and read my favorite magazines.


Until next time, happy decorating!


Psssst! I'm sharing this project at:

Furniture Feature Fridays


All Things Heart and Home


Making


UndertheTableandDreamingFunky Junk's Saturday Nite Special

Labels: , , , ,

Monday, February 21

Jonesing on these Painted Chairs...

Per my last post, I am in the midst of refinishing an old chair, and went looking for paint finish inspiration in my favorite places!  Now I am seriously jonesing on these droolworthy painted chairs.


You might have seen this one featured at Tatertots & Jello yesterday.  
You would not believe what it looked like before! 
I'm in LOVE.


Photo credits to Northwest Hospitality

And, this one from Miss Mustard Seed is simply divine.


Photo credits to Miss Mustard Seed 


I LOVE the distressed blue finish on this year by Lisa at Serendipity Chic Design.  
She always uses the most dreamy paint colours.


Photo credits to Lisa at Serendipity Chic Design

And, of course, I was drawn to this turquoise paint!


And, OK, so these next two aren't chairs.  

But, the finish on this dreamy blue cabinet from Dreamy Whites is heaven.
I've blogged about it before.  
LOVE.


Photo credits to Dreamy Whites.

And, this robin's egg blue armoire from Nesting Place is beyond delicious.


Photo credits to Nesting Place.

Decisions, decisions!

So many beautiful colours to choose from!

Until next time, happy decorating!


Labels: ,

Sunday, December 12

Win a distressed CAFE sign at Serendipity Chic Decor

I thought I'd let you know that one of my favorite decorating blogs, Serendipity Chic Decor, is running a great 100th Follower Giveaway! You could win an uber-awesome distressed CAFE sign!  It ends tonight at midnight.  Click here for the details.

Oh, and if you're wondering why it's one of my favorite blogs, well, I think this recent pic will answer that question! Lisa's re-finished furniture and upcycled thrift store finds are simply dreamy.  Visit her blog and click on one of her labels at the right (personally, I love the "French Country" section :-)) to see her fabulous work.

Photo credit to Serendipity Chic Decor

Labels: ,